
Did you know that if you complete a few simple steps before sending artwork to a professional printer, you’ll get a better finished product and potentially save yourself time or money by avoiding modifications to get artwork print ready?
It’s important to get your artwork print ready for several reasons.
- Readable and appealing – Checking to make sure you catch the most noticeable issues like spelling and grammar mistakes, poor image quality, and inconsistent color usage creates a more professional and visually attractive piece for customers.
- Consistent and clean – Adding in bleeds and margins ensures that each copy of the artwork printed looks identical, ensuring final pieces aren’t trimmed unevenly or that text and artwork isn’t accidentally cut off. Outlining your text ensures that the font you want to use is the one that gets printed – not a substitute font.
Broadstroke’s Art Department pre-flights all artwork files that are sent to us, and if all art and print specifications aren’t met, we’ll reach out to you about making modifications to ensure that it is. If you’re the one making modifications, this adds extra time to the project. Our Art Department is happy to make the modifications for you, but this adds not only time, but an hourly charge that is accrued to make the changes on your behalf.
Step 1 – Proofread
One of the things that the Broadstroke Art Department doesn’t do during the pre-flight process is read through all text on artwork to ensure there are no spelling errors or grammatical mistakes (plus, our designers are in fact designers and not English or Journalism majors)!
Our Art Department is also not going to know if information specific to your industry, organization, business or company is correct or that you’ve used the right contact information, so it’s crucial that several members of your team review this information on your end before you send it to us!
We recommend:
- Always having at least two different people review artwork for accuracy before sending the file to be printed.
- Checking spelling, grammar, and punctuation
- Making sure no numbers have been transposed – phone numbers, statistics, addresses, zip codes, page numbers, etc.
- Confirming the accuracy of your most important information. This includes names, phone numbers, addresses, locations, event dates, expiration dates, BOGO and sale prices, website addresses, social media usernames, QR code links, etc.
Step 2 – Image Quality, Embedded Files and Outlined Fonts
Making sure you have high resolution images embedded in your artwork and outlining your fonts are major elements in having an appealing, consistent, and clean print piece. Completing these pieces before you send your artwork to be printed can save you a lot of rework time!
This can be an easy step to skip because these items aren’t often noticeable when you’re looking at your artwork on a computer screen, but it makes a huge difference when your artwork is printed.
Image resolution
For print, you always want to make sure your images have a resolution of at least 300 dpi. Any lower and you risk pixelization (fuzzy / blurry images). An easy way to check your image resolution is to right click on your image file, select Properties from the drop-down menu, and select the Details tab. Under Image in this section, you’ll see a horizontal resolution and vertical resolution that will tell you the resolution of your image.
Checking image resolution within software programs is going to differ based on the program you are using, but you can usually look at your images in the artwork itself to see if they look clear or fuzzy.
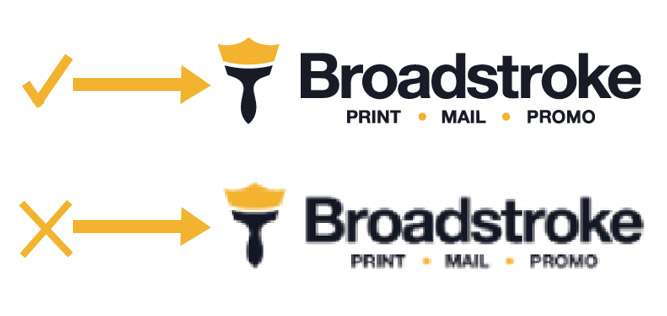
If you include a logo in your artwork, we strongly encourage you to use a vector file of that logo, like an .ai or .eps file. Vector files are better to use than .png or .jpg files because they work much like high resolution images, maintaining their crispness when resizing or printing.
Embed images
Embedding images includes your images in their original format so that quality is maintained for print and to avoid the images being stripped from your artwork, which can happen when an image file is linked instead. Here’s how you can embed artwork in common programs, if you even need to:
- Illustrator – Click on the image itself and in the upper toolbar go to Window > Links.
Find your image and click the options button (three horizontal stacked lines) and click embed image(s). - InDesign – In the upper toolbar go to File > Package. InDesign will create a folder containing all necessary fonts, images, and colors.
- Microsoft PowerPoint & Publisher – Automatically embeds images
- Microsoft Word – Automatically embeds images
Embedding images can increase the file size of your artwork, so if you have artwork that includes multiple large images, we recommend linking those images and supplying the original images to us along with your artwork file.
Outline or convert fonts to shapes when possible
Outlining or converting your fonts to shapes maintains the appearance of your fonts whether that font is available to our designers or not, and it prevents a software program from performing a font substitution.
Before you outline any fonts, ALWAYS save your editable file, then save a separate version of your artwork with fonts outlined as a new file that you can submit for printing. This ensures that you have a working version available in the event you need to make additional changes to your artwork.
Here’s how you can outline your fonts in Adobe Illustrator and InDesign:
Illustrator – two options
To select all text:
- In the upper toolbar go to Select > Object > All Text Objects. If you want to outline specific text only, you can use the selection tool + SHIFT to manually click on text boxes.
- Go to the properties panel via the right side of the screen or via the upper toolbar and click Window > Properties
- Quick Actions pops up by default. There, you can click the “Create Outlines” button OR you can go to the upper toolbar and click Type > Create Outlines
*Default shortcut for outlining is CTRL+ SHIFT + O
Package fonts and images (no outline option):
- Go to the upper toolbar and click File > Package
- Checkmark the options you want to package, including links (images) and fonts. This will give us the font file without having to outline
InDesign – two options
To select all text:
- Use the selection tool + SHIFT to manually click on text boxes.
- Go to the upper toolbar and click Type > Create Outlines
*Default shortcut for outlining is CTRL+ SHIFT + O
Package fonts and images (no outline option):
- Go to the upper toolbar and click File > Package
- Verify the font and linked images have the status marked “added”. Click the Package button when finished.
Some software, like Microsoft programs, do not have a native way for you to outline fonts. In those cases, providing fonts or font details to ensure the correct one(s) are used when your artwork is sent to print production is helpful for our Art Department. You can do this several ways:
- Send the font file to us, if you know where you have the file saved. This is usually an .otf or .ttf file, and it is necessary for you to send this to us when you’ve purchased a font from a font site or had one created specifically for your brand and you cannot outline the font.
- Provide us with the name(s) of the font(s) you have used in your artwork, and the software program you originally used to create your artwork. This helps the Art Department confirm the correct font is populated in your artwork instead of a substituted font.
Step 3 – Bleeds and Margins
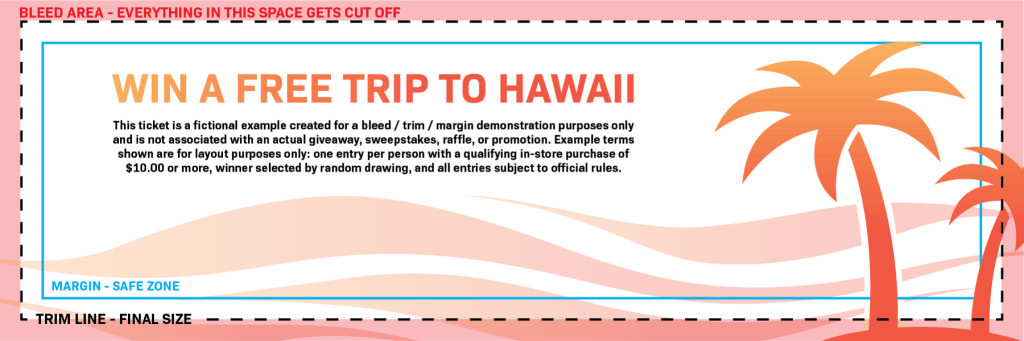
Imagine you printed a picture of the ocean and want to trim off the white space around your picture. When you start to cut around the image, you’ll notice your cuts aren’t perfect and you can still see some white on the edges! What you might decide to do is cut off just a little bit of the ocean picture so you can get a clean edge, THAT is what we call bleed.
- How do I know that I need bleed? – If at least ONE of the following applies to you, then your artwork needs bleed!
- I have pictures that go to the edges of my paper / canvas / artboard
- I have a background that goes to the edges of my paper / canvas / artboard
- How do I add bleed to my artwork? – There are two ways to do this!
- When you set your canvas size, add a minimum of 0.125” to the width and height of the final size you want your printed art to be (1” for wide format artwork like large banners or signage). For example, if you have a flyer that is supposed to be 8.5” x 11” then your canvas size should be 8.625” x 11.125”. This is great for software that does not typically have a bleed function.
- For software that has a bleed function, you will typically find this option in the popup panel when setting up your file. You can also typically open File or Edit on the upper toolbar, where there will be a document setting / canvas size option available.
Verifying margins and trim – A trim line is where your artwork will be cut down to its final size. Margins are the blank space between the edge of your printed artwork and your main content (important text, etc.). Make sure that you have at least 0.125” of margin between the trim line (or 1” for wide format items like large banners and signs) and content you do NOT want trimmed.
Step 4 – Saving Your File for Print
When saving a file for print, most printers prefer a .pdf file. Pdf files, short for “Portable Document Format”, were developed by Adobe. These work as a universal file format to share and view documents and can typically be opened in any software as is or via conversion. They work best by preserving exact layouts, fonts, formatting, and even some software settings (such as illustrator layers). For printers and anyone else, this makes for a (mostly) worry free mode of sharing editable and complicated artwork / documents back and forth. Think of .pdf as the Tupperware of the digital world: holds and saves everything, easy to share, easy to customize and change its contents, flexible and everyone uses them!
In some cases, you can also send working art files like .psd, .indd, .ai, or .eps files from software programs like Adobe Photoshop, InDesign or Illustrator, but .pdf is the preferred and easiest way to send completed artwork to printers.
Nearly all software will have the option to save or export to your preferred file type. All you need to do is ensure that the bleed is present if applicable.
Summary
This seems like a lot, but it really comes down to proofing, using and embedding high-quality images, outlining fonts or providing the names or files of the ones used, allowing yourself bleeds and margins, and saving your artwork in a format our Art Department can easily work with. Taking these steps helps ensure that your final printed piece matches what you’re looking at on your computer screen without creating additional rework.
If you don’t know where to start designing your artwork, or you want to have a designer create artwork on your behalf, reach out to Broadstroke! We don’t just do pre-flight checks for print; we offer full-service design as well and are happy to help bring your ideas to life.